Wednesday 4 July 2018

Secret Garden & Red Delicious Quilted

Hi Everyone,
Still not finding the time to write my blog regularly as have been on a roll with my stitching or rather quilting some of the tops that have been finished and waiting for me. This morning it is time for me to bring my diary a little more up to date.

First on my list was Secret Garden


Was very surprised to find that fmq finally seems to becoming easier for me, especially by the time I got to the end of the 70 something butterflies that I decided on for the backgrounds of my blocks.
Here are some closer pics.


With the applique butterflies I had already added I only stitched around all the applique in the center


A simple cross pattern for the corner blocks and replicated the applique motif in the triangles.


then it was butterflies


And more butterflies


Copied the different butterflies in each block so there was a variety to quilt.


Above photo shows the curved ruler Steve made for me for quilting around these blocks, he has also made me a straight ruler so have been practising with that as well.

Happy with Secret Garden it was time to start on Red Delicious.
I was really in a quandry about what to do as all the blocks are very different so didn't want to just use one pattern for everything. Decided the best way was just to start and see where it led me.


My straight ruler worked better than I expected


This scared me, some wobbles but best I could do.


I like doing clamshells, they were lots easier than I thought they would be.


Lots of searching to find a pattern I was comfortable with for these panels


Same design for here


Back to clamshells for this one.


And for here
 The clamshell blocks form part of the center panel 
so wanted to keep some order to my quilting


Wasn't sure what to do here so started by adding a simple vine to the main trunks.


Liked it so added it to the rest of the block


So much open space on this block I wasn't sure if I could keep my free motion consistent so
used a motif instead.


Very happy with how it came out


reduced the motif so I could use it again for this block


Cross hatch for this little block


Almost feathers for the Fan Block


Mix of the two sizes of motif for the central block.
Then the tablecloth had to be done


Echoed the curve of the tablecoth


was going to crosshatch this tablecloth but decided
the diagonal lines on there own gave more depth to the block


The heart then needed echo quiting as well


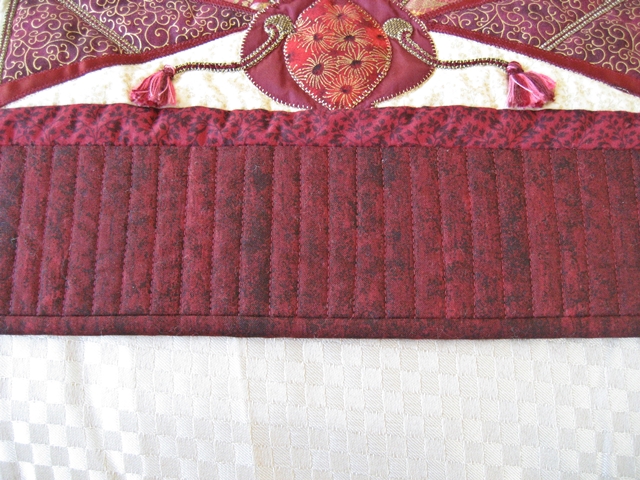
Finally the top and bottom borders.
RD is a rectangular quilt but not by a great amount so decided to do vertical stitching
 top and bottom to lengthen it visually


All done and am so happy with how it looks.

Biggest thing for me with finishing these two quilts is realising that my Free motion quilting is slowly improving and I am feeling more confident to try different things.

Still have more catching up to do with my blog diary but at least these two are recorded.

Enjoy your week everyone whatever you are doing.

Cheers Jenny

Wednesday 9 May 2018

Love Always 9th May

Hi Everyone,
Well, this year life has got in the way of my blogging. Have been meaning each week to write my quilting diary and each week I say I will do it next week so lots of catching up to do.
This week it is Love Always as it is fresh in my mind as have been working on part 5 this week.
In my last blog, way back in Jan I had just finished my center block.


Very happy and thought my colours for this quilt are set and know where I am heading with it.
Had an idea what I wanted for my vases, a sort of oriental look using fabrics that some metallic on them for an extra bit of bling along with my metallic thread.


Part two is tulips and I had a lovely mottled peach/pink fabric that was ideal for it.

Part 3 I loved making, it is much busier  and reminded me of Love Entwined with the tiny stems and little berries.


The stems were very narrow so used a variegated thread and triple stitch on machine to thread painted them in.


Finished and I think my favourite of the four vase blocks.

Part 4 a vase of carnation and wanted to use a sister fabric to the first block, pink with a bit of blue. This block had lots of twiggy stems to deal with first.


They were a little larger than in the last block so used a very small zigzag stitch to stitch them. 
Next was the flowers, tried the oval base to them in the pattern but couldn't get my colours right so opted to use part of another pattern of Esther's instead.


Very Happy, they look how I picture carnations to be.
Now to have the blocks so far together.


Very soft and romantic

I carried on with other things during the month but the more I looked at my blocks something was wrong, it was lovely but where was the pop?
There are still elements to add around the center but they can't be the pop so I started to play with my center flowers, making new ones that were darker and also introduced a bit of orange, to give me more options for my border flowers


With two made and pinned in place I liked the look, more so when placed with the completed blocks.


Felt I was on the right track but decided to leave it until the last block was made
1st of this month part 5 came out and was keen to make a start.


Decided on my vase fabric and carried through the gold I have used on all my vases.
Didn't want a solid colour for my star flowers so tried a little japanese print that is for my Queens Garden quilt.


It is a beautiful fabric with a wonderful sheen, had my blue that I wanted but also gold and green.
This is where the wheels fell off as when I put my vase up with the other blocks the balance fell apart and nothing gelled together.


My deeper center was going to work as it was drawing the eye in but  only my latest vase stood out and all the flowers were there but doing nothing. 
It was time for some serious reverse stitching so took all my blocks to quilt group last Friday and unpicked my center flowers and the two tall vases, felt they were the ones that would be easiest to alter, changing my block flowers was not an option LOL 

First for new fabric was the tulip block


Wasn't sure about this fabric but it brought my flowers to life.


Loved my original blue vase but it didn't have any variation in it even though it had lots of swirls, this is not my favourite fabriv but it brings out the colours in the flowers.

New Center Block

Like the first one I used a limited number of fabrics and changed their placement for each flower. Decided I didn't really like the way the center petal overlapped the side ones with these fabrics so put it underneath instead, strange because I was very happy with it on top in the lighter flowers.
Now I could finish my last block.


I wanted more gold tones to balance the yellow in my tulips so decided to go with an earthy look heading into orange and finish the star flowers with bright orange centers.


To stitch those tiny flower centers I reduced my inwards stitch width to 1.6 instead of my normal 1.8 but left the length between stitches at 2. You are turning your fabric every stitch on such a small circle, if the stitches are too close together or too long they will stitch over each other instead of being seperate.

With my block finished and all my changes made it was time to put them all back together.


Set out like the pattern with the similar shape vases opposite each other the vases look good but it is unbalanced


A change around and it all flows and is much better on the eye and
the flowers take center stage.

Hope you have enjoyed seeing how Love Always has evolved into a totally different quilt to how it started. Going to link with Esther's WOW on Wednesday now and head back to some stitching.

Enjoy your week everyone,
Cheers Jenny

Wednesday 17 January 2018

Work on Wed 17th Jan

Hi everyone,

Blogging got forgotten over Christmas and the New Year but do hope that it was a good time for you all and there was plenty of family and friends around you.
My time has been divided between stitching and gardening, we are finally after years of having building materials and may need one day things stored all around the yard getting outside things finished and the gardens in order so whenevr the weather has been not too hot have been outside.
After finishing Secret Garden put it aside until I found my backing. All my other quilt tops were finished as well so it was time for a new project.


In the Pink, another Esther's patterns from before I joined her group had been on my mind so it was time to make it. A lovely mix of piecing and applique that I found irresitible.

Had a fabric to use for the main fabric and found a wonderful hydrangea fabric to go with it so matched my other fabrics to that and was underway. Started with the pieced blocks, easiest one first


It is a straightforward nine patch that is then cut into four and rearrange and sewn back together. Straightaway could see I have far more contrast in my fabric than Esther so am ging to have a much stronger look.


Second of the blocks again a reassembled nine patch but you make the half square tringle blocks before you start, little more fiddly to get the points perfect but love how exact Esther's measurements always are. Cut correctly they go to together perfectly.


 Twelve blocks like this to make

With a few of these made started on to the first of the applique blocks, which I had to piece first.


A triangle strip which goes across the block. The first one, though I cut to measurement was too long so went back to my tried and true method of foundation or paper piecing it. Result was perfect and the triangles I had already cut worked perfectly. Next add to each side and the block is ready for applique. 


First applique block ready for stitching, have eight of these to make.
Doesn't show well here but am using two shade of purple for my flowers, single one and center one of the three are darker as are the little petals.


Next up five of these for the center, added a third purple as felt my other two were too similar in colour and wanted to get some more movement into the quilt.

The center is the trickiest part of this pattern. Esther puts five center blocks together and then adds the applique as the flower stems all crossover the seams into the center block. I decided to put nine blocks together and save myself having to worry about Y seams when adding the other blocks.


Put the first two rows of three together and suddenly realised my little applique swirls in the center had to go into those corner seams, thats why Esther had only put the five corner blocks together Lol
Luckily was able to add my swirls with only a little unpick of two seams before adding the bottom three blocks.


Laid out on the floor the pattern is starting to come together.

It took a couple of sessions to position the flowers and lay all the stems into the center


Love how the center looks.

Haven't started stitching it yet as got sidetracked into writing a tutorial on how I set up my machine and do my applique stitching. Wrote this up last week so have a look if you would like to know more.

Then it was the 1st Jan and Esther released her BOM's for 2018, all gorgeous and I did have trouble deciding which to make but Love Always had a special pull because of its relationship to Love Entwined. Couldn't get my head around a colourway so finally decided to make the center from my stash and see what happened. 
Didn't take many photo's along the way s wasn't sure if I would continue with it, even using an offcut of fabric not quite the right size for my background


Decided I want to make this without using batiks which are my turn to fabric for flowers and leaves.
Already failed with this as my circle is a batik.
Fussy cut my star center from an oriental fabric with gold accents and placed it on a cream with gold so that headed me down the metallic look as well, so finished it off with metallic thread.
Was very happy with my first flower so decided to make the other two from the same four fabrics and try for a different look for each one.


It worked, loving the varying tones in what is obviously the same flower.

Had a decision to make at this stage, metallic thread for the stems and leaves or not as had used it for everything else. 


Decision made, stayed with the gold and think it was the right choice, block just sparkles.
It is Maderia mettalic No3 a soft gold which gives a lovely aged look. My machine is set exactly the same as I stitch my other applique and gives me no problem
Have not stitched the outer edge of circle yet. Will do that when the center is placed on the next ring.


Closeup of fabrics and stitching

Hooray, my blogging is up to date and hopefull I can stay that way for a while.
Linking to Esther's  WOW then will get some stitching done.
Enjoy your stitching everyone.
Cheers Jenny